The one that I wanted to paint is a peacock.
It casts some beautiful rainbows, but you have to look very very closely to see the colour in it.
So I took a photo and blew it up and from there I started to draw, mask and paint.
Here's the drawing on a quarter sheet, with all the facets and shapes of the colours drawn in

and here is the masking laid down to preserve the whites

the sky through the window is french ultramarine and the door a gold ochre. The shadows on the window and sill a a very weak wash of winsor green and alizarin crimson.
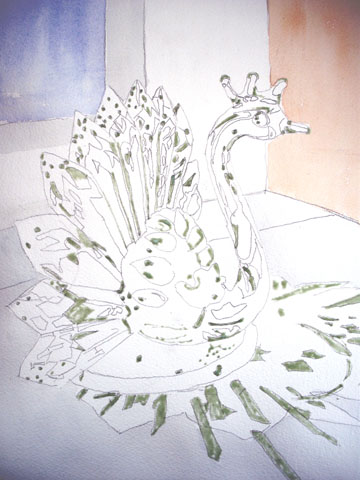
The deeper shadows are french ultramarine and alizarin crimson

and the tips of the feathers and body of the bird are gold ochre.
The base of the mirrored stand is a weak mix of the winsor green and alizarin crimson.

more to follow another day...


cx.jpg)


.jpg)


.jpg)


What a brilliant start, it looks good already and not even finished yet!...
ReplyDeleteYour painting is so delicate, Pat, just as your crystal. I want to see next stage! Wish you a nice tuesday , full of time to paint
ReplyDeleteYou have to be very patient in your creations, don't you? I think painting is not for me...
ReplyDeleteWow, this is looking really good and also very elaborate. Looking forward to seeing the final result. xx
ReplyDeleteI can't wait to see more. That is a very ambitious project, Pat!
ReplyDeleteThanks, Ann. It feels good ! xx
ReplyDeleteThanks, Anamaria. Sadly no painting today, I'm working. Won't be too long though.
Tonya, I can't believe you! I've seen the Mabry Mill pieces - so tiny, so many, and you have to sew them. You need so much more patience than me! xx
Thanks, Jane. I think the drawing looks very elaborate, hopefully the painting will look cohesive. xx
It is ambitious, Kathryn, but what do I always say - its only paper - so no fear! :lol: xx
This is going to be beautiful! That's a lovely subject and a very creative composition, with the lines in the background. Your step-by-step demos are so informative, especially knowing what colors you used and how they look together. Thanks!
ReplyDeletethank you, Katherine. I'm pleased you find the step by steps informative :)
ReplyDeleteI'm hoping the painting does turn out beautiful :) xx
Hi,Pat,
ReplyDelete...wow...awesome... really great. Not easy subject, but you're doing very well and quite organized. Furthermore, you share the precious info. Thank you. You're so lovely.
Cheers,Sadami
Pat,
ReplyDeleteThanks for sharing this. Looking forward to more on this..
That must be a very hard thing to paint,looking forward to seeing the next step.
ReplyDeleteThanks for your visit, mom says she was sick of making dog biscults but it was for a good cause.
Hugs to Missy and you.
Have a good week
see yea George xxx
Tess's kennel club name is Kissie Missy, Howard named her Tess but I still call her Missy sometimes.
i love to see these step by step posts of yours. It's fascinating to me how a painting comes to life
ReplyDeleteThanks, Sadami. I like to share knowledge. Everyone should have a go! :) xx
ReplyDeleteThanks, Prabal. Hope you enjoy the new stages. xx
Thanks, Ann. Glad to know you enjoy it xx