Showing posts with label floral. Show all posts

Monday, 9 September 2013

Summer splash

Up until yesterday afternoon we were still having beautiful sunshine, which all my flowers appreciated!

So what did I paint this week, but a flower!

Here it is, a vibrant Summer Splash


Friday, 20 April 2012

The Juice Bar

Over on Painting Friends ( here ) 
we have a challenge to paint some coneflowers and butterfly.

So, this is what I've done, I call it

The Juice Bar


Its on Arches 140 rough ,  11 x 8 inches.
I hope you enjoy it :)


Sunday, 15 April 2012

Patty's Poppy

My holiday's nearly over and I have been painting, just not as much as I'd like!
Isn't that always the way?

We were having a poppy challenge over on Painting Friends ( click HERE for website)  so I decided to join in .
I took the photo and cropped it further, because I like those images where you are in the heart of the flower.

Without further ado,

Patty's Poppy


This painting - and all the paintings I've ever made - can always be seen on my gallery website HERE

Wednesday, 15 February 2012

Flight of the Bumble Bee

 A new painting, using one of my digital microscope photos as reference.

The close up photo was one of a flowering top of lavender that had missed the trim back before winter set in.
The title comes from the fact that this is the close up view, seen from above - not a view we normally see, but a bee would!


Flight of the Bumble Bee


Saturday, 7 January 2012

The Alphabet Paintings: R

The alphabet paintings continue with the letter R and a memory from childhood...

When I was growing up, I remember reading a whimsical tale of how God named all the flowers. When He was walking in the garden one day, he came across this pretty blue flower and asked for its name. The blue flower bashfully replied that he couldn't remember. So God whispered to the flower, "remember that I love you, forget-me-not"

Remember that I love you


Tuesday, 20 December 2011

Year of Painting, Rose.

On the Painting Friends forum, its time for the Year of Painting. This month we had a white rose as a reference to work from.
The idea of painting once a month is for you to analyse your work and grow from the experience.

Today, I thought I'd share the whole post with you, not just the final painting, as I did with V: The Other Side of the River.


Year of Painting (YOP)

Number Nine, Rose

Personal Goals for this Painting:

Firstly I set some goals for my thumbnail sketches.
These were :
  1. do a thumbnail showing the scene as is.
  2. on the other thumbs, show different crops and ideas
  3. Paint all four thumbs.


I chose to paint all four thumbnails. Why I did this was to push myself to get more out from these YOPs. To try each technique and crop. To find something in each I could like and learn from.

So, here are the paintings:

Dark Rose 

 
8 x 11 Arches 140 Rough
I changed the colour of the rose. Solely because I'd not long since painted a white rose in “The Shadow of Your Love.”
I like this rose in parts. I love the bud and the background and leaves. Also the outer petals of the rose, but I feel I made a mistake to paint all the petals because I feel I've lost it in the inner shadows. I've painted in glaze after glaze to give a richer colour, therefore I can't lift the shadow without ruining the petal. A lesson learned – plan more if you want to be that literal and paint your shadows first!

Christmas Rose


8 x 11 Arches 140 Rough
Love the richness of this impasto version, it feels like a oil. That's probably because for the first time, I've painted it completely with a palette knife.
Its taught me that although its ok as a small painting ( 8x11 ) it would be stunning as a large, full sheet version.
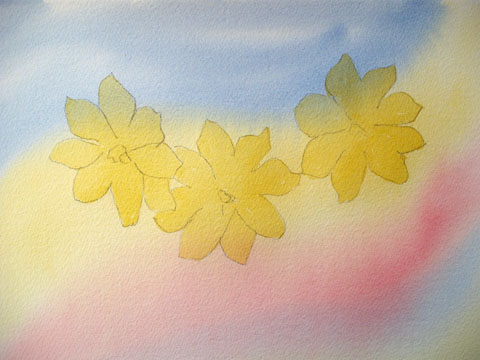
Rosebud


8 x 11 Arches 140 Rough
This , I love everything about it. Lesson learned, take an element of a photo, that really suits me better than using the whole!

Sweet Rose


8 x 11 Arches 140 Rough
I love pointillism, it feels like meditation to me when I work in this way. Love the way this came out, reminding me of a sugar frosted rose. I wouldn't change it at all, I even like the way the petals have different colour variations.

Challenges Faced
Painting all four thumbs and trying to be creative with them all. Hardest of all was to paint the “as is” thumbnail, when it was never a photo I'd have chosen for a reference.


Share Personal Goals and whether you felt you Met Them
My personal goals were to be creative in all four paintings and to learn something from each, which I have done in varying degrees.

How I created the Paintings.
Multiple glazes in Dark Rose on the rose. Some negative painting in the background.
All impasto using aquapasto as well as watercolour and a palette knife in Christmas Rose
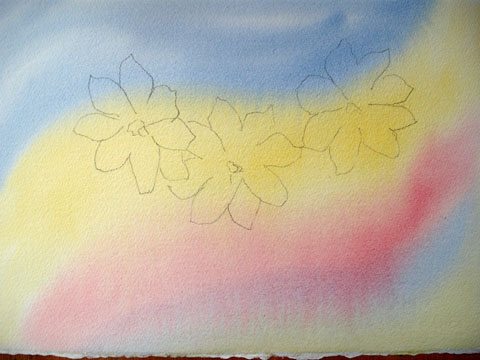
Loose background wash for sky in Rosebud and merging wet in wet washes for the rose and shadows.
All pointillism in Sweet Rose. A dot at a time. It took the longest time of all.


Size of Painting, Medium, Palette and Brushes.

The paintings are on Arches 140 Rough and are 8” x 11”
The medium is pencil for the under drawing and watercolour for the painting. (addition of aquapasto for Christmas Rose only)
W&N artists quality paint.
Palette colours used : transparent yellow, cadmium red, french ultramarine, sap green, olive green, indigo.
Brushes: round 12, round 6, round 2. palette knife.

Hope you've enjoyed this peek into my thoughts and practices.

Monday, 31 October 2011

The Shadow of your Love

Shadows.. I always think they make a painting.
So when I started this one, I decided to paint the shadows first.
When they were done, I loved it so much, its staying that way.
Here it is, painted on Arches 140 Rough , 15" x 11"


The Shadow of your Love


Saturday, 10 September 2011

The Three Sisters

Yesterday I spent some more time on the step by step, and I think its finished. But I will wait a few days before I make that final call, because something else might pop out at me, or someone may come up with a suggestion that makes me think - oh yes, that would make it better!
That does happen, and I am not above taking suggestion to improve my paintings.

Sometimes when I visit other blogs, I am mindful not to say how or what I would change, because that would make it my painting - and we should allow each their own style! But at times, I can see how the addition of a darker shadow, or continuity in light source could improve what is there.
I'm happy for anyone to make constructive comments in the same vein.


Anyway, here's the first photo from yesterday.

Using a sap green and ultramarine mix, with varying degrees of stickiness, I painted some vague foliage and then some more defined foliage.
I did this because I wanted to express that the three flowers could be on a vine, or could be three flowers standing independently. I like that kind of ambiguity. Not always do I want my paintings to be clear cut, so that what you first see is all there is.
I then added some splatter , in dark green mix, and alizarin on its own.
To do this, load one brush with paint and then tap it against a second one, held at an angle that makes a cross - an upright one, like Jesus' cross - not an X cross. Make sure you cover the flowers with a piece of paper, if you don't want them splattered too :)

I looked at the painting for a while and the flowers seemed a little bland to me, so I deepened some shadows and added some veins. I made them stronger on the right most flower, to give one flower that stood out more than the others.
I think its finished now, unless of course, you'd like to come up with a suggestion to improve it.  I hope you've enjoyed how this painting has progressed.

One last hint someone else gave me. Click the picture to get the larger version, then squint as you view it. Apparently that gives you a rough impression of how you would see it on a wall, when you're seated!


The Three Sisters

Friday, 9 September 2011

Building some interest

Good morning, friends.

This post is not about increasing your savings, but building interest in the floral  painting :)

Underneath the flowers, brush in some clean wet water. Have your board at a tilt, so the water will run down a little.
With a light mix of ultramarine and sap green,  dab the brush just under the flower, so the wash blends into the clean water.

Also - make a couple of stems and swirls with the blue/green mix and add some aureolin dashes of paint with your rigger, to make some interesting flower spikes and vine type clingers.

With any luck, it should come out, something like this.


I am working at the day job this morning, but will be painting again this afternoon, so hopefully should have some more to show you tomorrow.
It will be building up some greens underneath the flowers. So don't wash your mix off your palette!

Thursday, 8 September 2011

Time for a watch along experiment.

Do you remember the Famous Cactus? It had the swirly swishy background.

I was wondering what to paint, so thought to try an experiment.. the swirly background and a floral painting.

I have drawn the flowers from my imagination. Not sure if that's a good idea, but time will tell.

So here are the first few steps. If anyone wants to try this out for themselves - be my guest!

firstly, the drawing

Wet the paper completely, then add the background washes. A lazy S shaped swish of french ultramarine, alizarin crimson and aureolin.


after that has dried completely ( which takes a while as it was very wet) I add a second wash of aureolin to the flowers alone


that's it for today, will be back soon with some more stages.
Hope you've enjoyed and even feel inspired :)

Monday, 16 May 2011

The Gift.

Yesterday I carried on down the abstract route.
I simplified a vase and flowers by making a contour drawing.
That is, an outline drawing of the edges of the flower mass and the edges of the vase. That's all.
Then I studied shadows and colour and simplified them.
This is what I came up with:


The Gift


Monday, 23 August 2010

D-Day for Rocky

Here is the finished painting:

D-Day for Rocky


This painting will be added to my permanent gallery

Pat Elliott Paintings

Sunday, 22 August 2010

Stage Three

In this stage, I am painting another layer, but this time with more definition - and some negative painting too.


I really like this background and foliage technique, it is definitely one I will use again.

Saturday, 21 August 2010

Stage Two

After the first background was was left to dry, the paper was completely wet again and a second set of washes laid down.

These also had to be left to dry.
This painting technique needs a great deal of patience - or a pile of ironing!


This is one of my "secrets"
Between very wet washes that need to be bone dry before you paint again, I go off and iron at least four garments.
That way when I return, my painting is ready for the next stage!

Feel free to use that technique :lol:

Friday, 20 August 2010

More Flowers!

You know by now there wasn't a holiday away this year, that I had a new summerhouse/art studio instead.

And in the break, I have been practising floral paintings, using the techniques outlined in North Light's Big Book of Painting Watercolour flowers.

Here is the beginning of another of these practice pieces

Wednesday, 14 July 2010

Summer ShowStoppers - a work in progress

In an earlier post, I mentioned how I like to try something new over the summer break.

This year I wanted to concentrate on my floral paintings.

Whilst I eagerly await the arrival of North Light's Big book of painting watercolor flowers from the US, I decided to pick up a book by Wendy Tait and practice one of the demos.

Here is the drawing of what will become some showstopping summer fuchsias.


Related Posts with Thumbnails